
Here is the uncomfortable truth about EU5's economy: you do not own most of what you own. The map says a province is yours, the goods are being produced, the trade routes run — and still the treasury crawls. The missing piece is almost never the building, the RGO, or the trade route. It is that your state cannot actually reach the wealth it nominally holds. Control is state reach, and reach decays with distance, terrain, and neglect.
The good news is that control is not a mystery stat. It is a small machine with visible gears: proximity feeds it, a handful of modifiers cap it, and every single number involved is displayed somewhere on screen. Once you can read the machine, you stop guessing which province to develop and start knowing.
What Control Actually Does
Control runs from 0 to 100, and it is a gate on taxation, not on production. That distinction is the whole mechanic, so it deserves to be stated twice. A location creates wealth through its RGOs, buildings, and trade. Control then decides what fraction of that wealth becomes taxable base. Everything downstream — estate shares, estate tax rates, your treasury — operates on the post-control number.
Run the arithmetic once and you will never misread a province again. Take a location with 10 ducats of wealth and 50% control. Only 5 ducats become taxable; the other 5 go straight to the estates before you ever see them. Now split that taxable base between two estates of equal power, each taxed at 50%. Your treasury receives 2.5 ducats from a 10-ducat location. A quarter. Nothing in this chain is broken, no building is underperforming — this is simply what the machine does when control is mediocre.
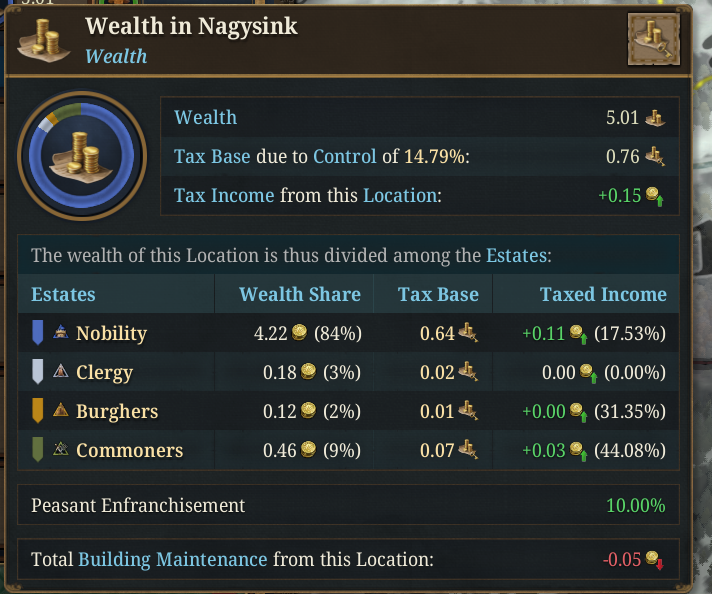
The tooltip chain: wealth, then control converting it into taxable base, then the estates taking their share. Read it in this order and the "missing" money is never missing.
Real provinces are worse than the toy example, because the penalties compound. A location with 31 ducats of total wealth and 85% control — already a respectable number — starts from a taxable base of about 26. Spread that wealth across four estates, with traders holding the lion's share and the church paying no tax at all, and the other three estates taxed around 48%. The treasury ends up with roughly a third of the province's total wealth. Eighty-five percent control, and you still keep thirty-three cents on the ducat. This is why veterans obsess over the last ten points of control: the curve is steep at the top, and the estates are always hungry.
Now the flip side, the one that keeps control from being the only stat in the game. Control does not touch output. A mine at 20% control still digs up the same amount of gold. A workshop still crafts the same goods. The product still reaches the market, and you still earn from selling it through trade. What low control strips away is the tax on that activity — plus manpower and sailors from buildings, levy size, and the speed at which population advances into higher social tiers. The one genuine upside of low control: you can hire more mercenaries there, which is cold comfort but occasionally saves a frontier war.
The practical consequence is a targeting rule you can use for the rest of the campaign: spend control effort where taxes concentrate. Cities with workshops, processing buildings, and dense population are control priorities, because that is where the taxable base lives. A remote extraction province whose output you process and sell elsewhere benefits far less from your attention. Control is not equally valuable everywhere, and treating it as if it were is how players bankrupt themselves building roads to nowhere. For the full tax pipeline this section plugs into, the EU5 economy guide goes deeper than this page can.
Why Low Control Hurts More Than It Looks
If control only reduced income, low control would be tolerable — you would simply earn less from faraway places. The modern EU5 economy adds a twist that makes it actively dangerous: your scaling costs read your total wealth, not your tax base. The cost of running your court, your diplomatic apparatus, and your stability scales with the size of the economy you would have if everything were fully controlled. You pay as if you were rich. You collect as if you were not.
This creates a ratio that quietly governs your entire campaign: tax base divided by total wealth. Keep it high and the game feels generous — scaling costs shrink into rounding errors and nearly every ducat of growth becomes spendable. Let it collapse and you get the signature EU5 complaint, the one posted in every forum: "my country is rich and I am constantly broke." The wealth is real. The costs it triggers are real. The tax base that should cover them never materialized, because control never did.
Watch how this plays out in a wide, under-controlled realm. Early on, the ratio can sit around 40%: for every 100 ducats of wealth on paper, you tax 40, and your scaling costs are computed on the full 100. At that point court and administration can consume your entire income before you have bought a single regiment. Push the ratio past 50% — by raising control, not by conquering more — and the same costs become trivial. The difference between a struggling realm and a snowballing one is frequently not size, not technology, not war luck. It is that one ratio.
From this, two strategic conclusions fall out that shape strong campaigns:
First, do not develop land you cannot control. Upgrading an RGO in a distant, low-control province feels like investment and is actually self-sabotage. The money you pour in raises the province's wealth — which the estates absorb and which inflates your scaling costs — while the tax base barely moves, because control still gates it. You did not build wealth. You built a worse ratio. Invest where proximity and control already exist; fix reach first, then develop.
Second, tall beats wide, and wide must pay a control tax. A compact realm keeps every province near a capital or a governor, holds a high ratio almost for free, and compounds. A sprawling empire inherits a control problem with every conquest and must actively buy the infrastructure — governors, roads, bridges, fleets — to keep the ratio from collapsing. Wide play is not impossible; it is simply expensive in exactly the places new players do not budget for. If you insist on painting the map, the estates and crown power guide covers the other half of keeping a large realm obedient while you fix its reach.
Proximity: The Engine Under Control
Control has a ceiling and a fill level, and most players only ever look at the ceiling. Buildings, integration status, location rank, temples — all of these raise your maximum control. None of them fills it. The thing that fills it is proximity, and proximity is the single most important economic stat you never directly see on a scoreboard.
The model is simple. Your capital emits 100 points of proximity. That value travels outward, location by location, and every location it crosses spends some of it. Whatever is left when the signal arrives is that location's proximity — and proximity converts into control at a steep rate. A location sitting at full proximity already gets the large majority of its control from proximity alone, before a single building or modifier is counted. In a developed core, proximity typically contributes more to maximum control than every other source combined. Buildings are the seasoning; proximity is the meal.
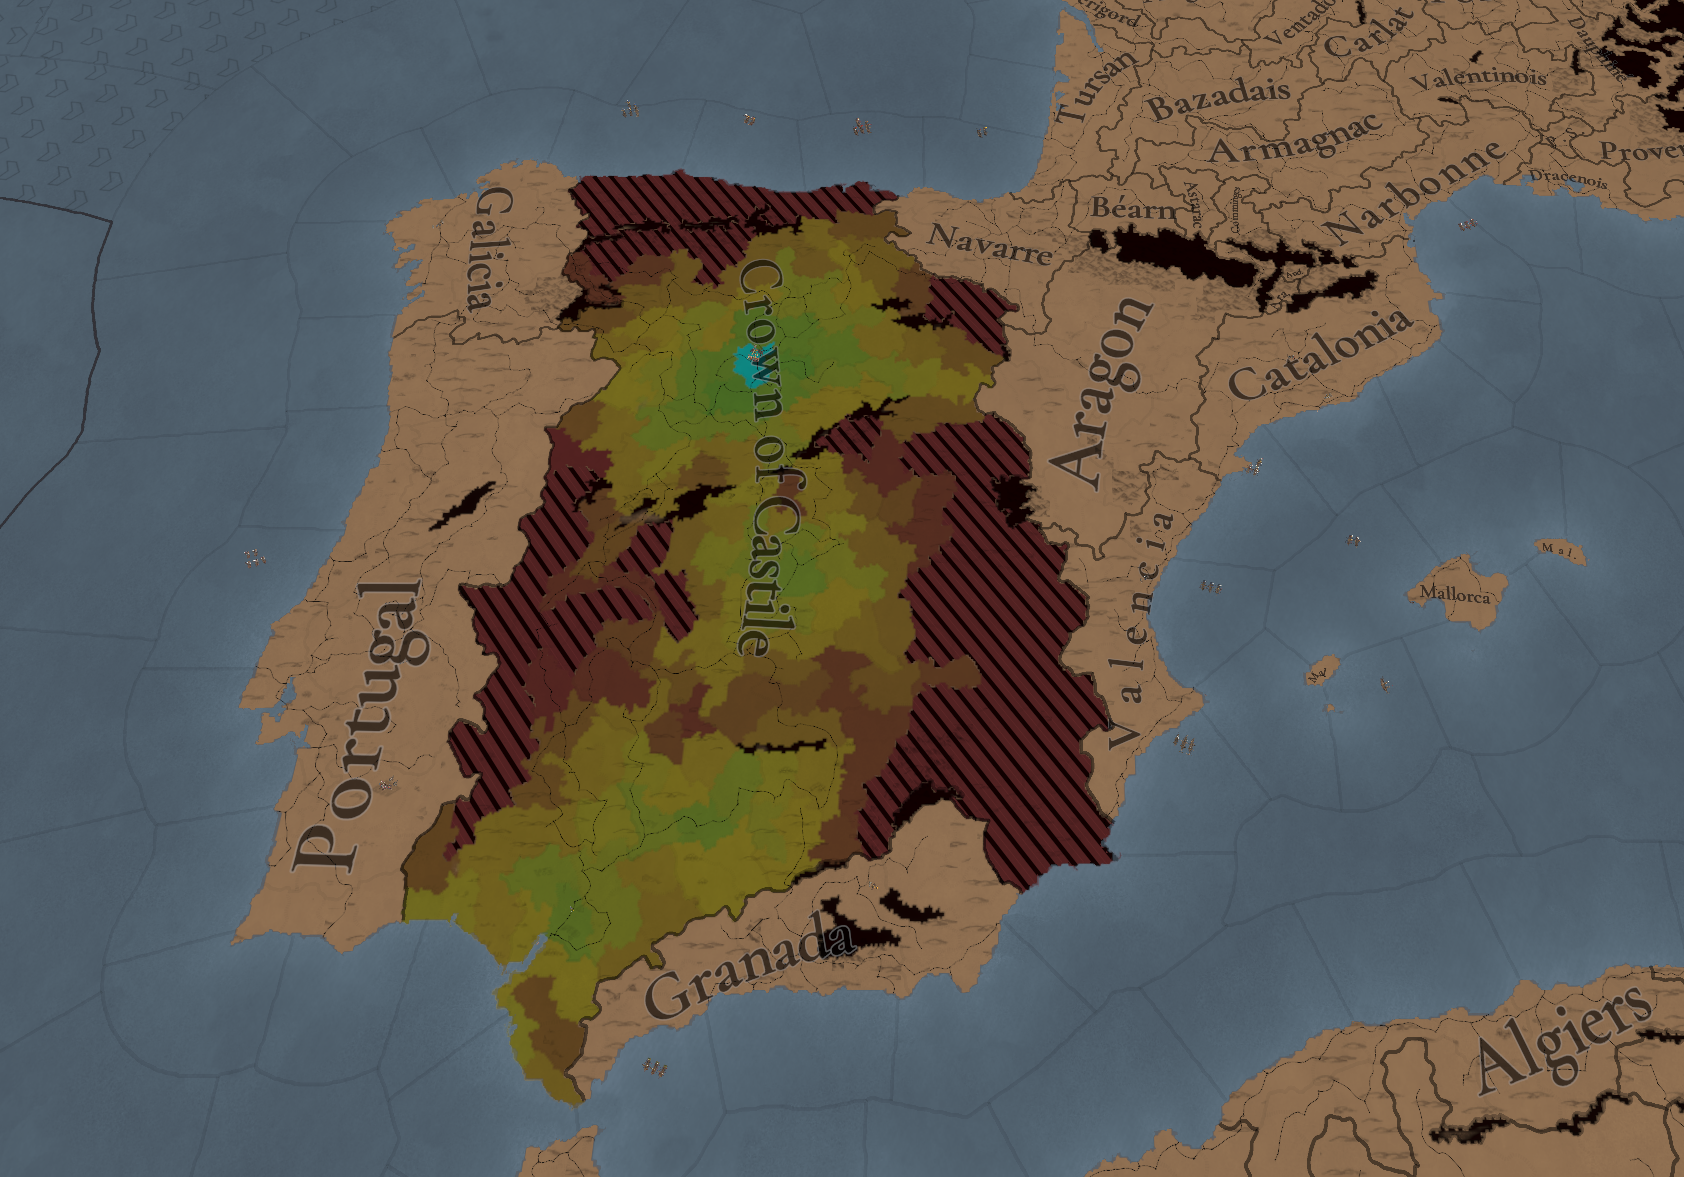
The proximity map mode draws the cheapest route from your capital and prices every hop. This is where control problems get diagnosed, one connection at a time.
Three properties of proximity decide everything downstream:
The game always picks the cheapest route. You do not choose where proximity flows. The game computes the least-cost path from the capital to each location and uses that. Your job is therefore not to route anything — it is to make cheap paths exist. A river you never thought about is already carrying your control further than the road you proudly built. Conversely, one unroaded connection can silently force proximity onto a long detour and halve a province's value.
Proximity spends down and stops. Each hop subtracts its cost from the running total, and propagation ends the moment the total would drop below zero. Proximity can never go negative and can never reduce control — it simply runs out. This is why distance is structural: beyond a certain radius, no amount of wishing produces control, because the signal from the capital has fully dissipated. The only answers at that range are a secondary proximity source (a governor, certain buildings) or accepting that the land belongs to a subject instead of to your budget.
The ceiling is real, and it bites. Stack every maximum-control bonus in the game on a location — core status, city rank, temple — and you might reach a 35-point ceiling before proximity. Add strong proximity and the location cruises toward 100. Remove proximity and that same location is capped far below its bonuses, forever. Players who build temples in distant provinces and wonder why nothing happens are raising a ceiling that nothing is rising toward.
Pin three map modes to your bottom bar and leave them there: the control map, the proximity map, and the population satisfaction map (nested under the population modes). Between them they answer every control question the game can pose. Click a province in proximity mode and the game draws the cheapest path from the capital and prices each hop; hover an individual connection and it itemizes every modifier on that specific step. That tooltip is the closest thing EU5 has to a source code view. Use it constantly and you will never need to guess why a province underperforms.
Rivers, Roads, and the Order of Operations
Proximity is bought with travel cost, and travel cost has an arithmetic. Learning it turns control from a vibe into an engineering problem. The base price of crossing one land location is 40. From a capital at 100 proximity, that means neighboring locations arrive at 60, the next ring at 20, and everything beyond at zero — before any reductions. The entire game of land control is the game of cutting that 40 down.
The reductions come in two families, and the order they apply in matters:
First, flat reductions: rivers and roads. These subtract directly from the 40, and they are by far the biggest lever in the game. A river running downstream from your capital cuts around 30 off each crossing; upstream travel still gets a smaller reduction, roughly 10. Roads start at a basic gravel road cutting 20 and improve in steps up to the railway, which cuts around 35 — enough to finally beat a river. After flat reductions, a river-fed or railed connection can cost as little as 5 to 10 to cross, which is how a single capital ends up covering an entire river basin.
Second, percentage modifiers applied to whatever remains. Terrain and vegetation multiply the post-reduction cost: mountains add around half again as much, forests and hills around a quarter, while open farmland adds almost nothing. You cannot flatten a mountain or clear a forest, which is exactly why capital placement is a control decision, not just a flavor one — a capital sitting upstream on a river, ringed by flat terrain and road connections, projects power a mountain-ringed capital never will. Development, certain buildings like bridges and canals, laws, national values such as centralization, government reforms, and your ruler's administrative skill all chip away here too. The ruler's admin stat is quietly one of the most important numbers in the campaign for exactly this reason.
| Connection type | Typical flat reduction | What to know |
|---|---|---|
| River, downstream from capital | ~30 off | The best early-game highway. Site your capital upstream and an entire basin becomes cheap to reach. |
| River, upstream | ~10 off | Real but modest. Upstream provinces always cost more to hold than downstream ones. |
| Gravel road | ~20 off | Available from the start. Your main tool where rivers do not run. |
| Modern road | ~30 off | Roughly matches a downstream river. By now, rivers stop mattering on this tile. |
| Railway | ~35 off | The endgame capstone. Beats everything, including rivers. |
One rule above all others: rivers and roads do not stack. For each connection, the game takes the single best flat reduction and ignores the rest. A gravel road built on a tile that a downstream river already discounts by 30 contributes exactly nothing — the river wins and the road is dead money. Early on, rivers beat every road you can build; late, the modern road and railway overtake the river. Build roads where rivers are absent, and never pay twice for the same connection.
Now the trap that costs new players entire regions: the road map lies by omission. A tile can show as "has a gravel road" while roads are missing in half of its nine possible directions. Proximity that should flow through that tile instead hits a wall and detours for dozens of points. The per-tile roads panel can even claim there is nothing left to build while connections are still missing. The only reliable check is manual: hover each connection in proximity mode, watch the cost, and open the capital's roads panel to queue whatever is absent. Finding three missing roads around a capital and watching a frontier province's proximity jump is a rite of passage — do it early, before you blame the wrong system.
When a connection's cost looks wrong, diagnose it the way an engineer would. Proximity map, hover the location, hover the specific connection, and read the itemized modifiers. If the flat reduction you expected is missing, the road or river is not actually connecting in that direction. If the percentage line is ugly, you are paying a terrain or vegetation tax you can never remove — which is information about where your borders should stop growing. This two-minute check replaces hours of speculative building.
Sea Control: Harbors and Maritime Presence
Everything so far was land. The sea runs on the same principle — proximity spending itself per hop — with its own base cost, roughly 30 per sea zone, and its own two levers. Players who master land control and ignore the sea end up with wealthy, useless coastlines; players who master the sea end up with overseas provinces that are cheaper to hold than their own hinterland.
Lever one: harbor capacity. When proximity crosses between land and sea, it pays a port cost at the crossing location, and that cost is cut by the location's harbor capacity. A natural port provides a fraction of a point for free; at one full point of capacity, the crossing cost is roughly halved, and harbor buildings like wharves push past that. Early game, natural ports dominate sea routing so completely that sensible routes deliberately funnel through them — sailing to a good port and finishing overland often beats sailing straight to a portless destination.
Here is the gotcha nobody warns you about: every harbor faces exactly one sea zone — the water it physically touches. If your control reaches a coastal location overland, or from a different sea than its harbor faces, the harbor capacity contributes nothing. The fix is counterintuitive: make the sea route cheaper until the game prefers it. Raise maritime presence, and suddenly "through the sea, then through the harbor" undercuts the direct path and your harbor starts earning its keep.
Lever two: maritime presence. You cannot pave the ocean, so ships stand in for roads. Sea zones are grouped into provinces, and a fleet stationed at sea raises maritime presence across every zone in that province. At maximum presence, crossing a sea zone costs about as much as crossing land on a railway — single digits. Two things make this remarkable: unlike railways, maximum maritime presence is achievable from your very first year, and it only gets easier as better ships with higher presence values unlock. A naval empire's control problem is, in practice, solved from the start if it bothers to sail.
The fleet recipe is short. Build ships with a high maritime presence value — light ships are the workhorses, galleys are fine, heavy ships contribute less per cost, and transports contribute almost nothing, so never assign them to this job. Keep the fleet at sea, not in port. Give it a patrol objective across your sea provinces, roughly four sea zones per twenty ships as a starting ratio. A patrolling fleet works an area until presence hits maximum, then rotates on — so a fleet that looks idle on a maxed zone is doing exactly what you asked. Buildings like naval batteries add permanent local presence on top.
Step back and two viable extremes emerge, plus one fatal middle. Full naval control is nearly free: with maritime presence maxed and harbors developed, overseas land costs almost nothing to hold. Full land control also works, if you stack the modifiers — nations with strong unique land reforms can project proximity across continental distances without ever needing modern roads. What does not work is the middle: no roads, no navy, no stacked modifiers, just a growing blob. That is where control dies, and where the "rich but broke" campaigns are born. Decide which extreme your geography points toward, and commit.
The Integration Ladder: Conquered to Core
Proximity fills control; status, rank, and satisfaction set the ceiling it fills toward. Conquered land starts at the bottom of a ladder, and every rung is worth real money. Climbing it on each acquisition is the difference between an empire that compounds and one that slowly drowns in its own perimeter.
| Status | Control effect | How you get there |
|---|---|---|
| Recently conquered | Penalty of around 10 to maximum control. | Automatic on conquest. This is the starting rung, not a destination. |
| Integrated | Bonus of around 5. | The cabinet integrate action (a military-scaled job), or releasing and later annexing a vassal. |
| Core | Bonus of around 20, plus its own control growth. | Integration plus a majority of the population being your primary or an accepted culture. |
The core requirement deserves special attention because it is where campaigns stall. A location becomes core only once an accepted culture makes up a large enough share of its population — and that share is one of the values the game has rebalanced repeatedly, so do not memorize it. Open the location panel: the requirement is printed right there next to the core status, with your current progress toward it. Read the number the game is showing you today.
To move a culture from merely present to accepted, it must first be large enough as a share of your whole country to qualify — tiny minorities can only be tolerated, not accepted — and both steps cost prestige. Two tricks make this cheaper in practice. Releasing a vassal of the right culture and improving relations with it lowers the cultural capacity cost of accepting that culture. And a civil war, for all its misery, resets estate satisfaction to the midpoint, which opens a window to strip estate privileges that were blocking your integration agenda before anyone can revolt about it. The diplomacy guide covers vassal release and annexation timing in full.
Location rank is the second ceiling raiser, and it is bought with growth. A rural settlement contributes nothing. Reaching town size adds around 5 to maximum control; reaching city size adds around 10, with a further jump available for the largest settlements. The population thresholds are shown on the location itself, so let the game tell you how close you are. When a settlement upgrades, the first building to drop in it is a temple — a cheap, permanent control bonus that stacks with everything else. The long-term ambition writes itself: turn every core location into a city, spreading cities as far as your economy can support them, capital-adjacent provinces first, because those always enjoy the strongest proximity.
Population satisfaction is the ceiling raiser everyone forgets, because it only works in negative. A content population imposes no penalty; an unhappy one drags maximum control down, by up to ten points at the bottom. The usual culprits are cultural non-acceptance, religious difference, and unmet goods demand — and the last one is the easy fix, because it is solved by simply importing the missing good into the location's market. Hover the individual pops on a location to see their exact complaint list. There is also a hard line to know: population happiness below roughly a third trends toward joining rebels, while above that band people settle down. Keeping pops fed and supplied is not just nice — it is a control policy. The trade and markets guide explains how goods actually reach the locations that demand them.
Two temporary levers round out the ladder, and both come with warnings. Armies raise control where they stand and across the whole province — a stationed force can add twenty-plus points locally and a smaller boost to every other location in the province, and early in a campaign this works with levies, which is a fine reason not to disband them the day a war ends. But maintenance grows faster than the benefit, so treat armies as an incidental peace-time bonus, not a garrison doctrine. The cabinet's increase-control action scales with your administrator's skill and can add a meaningful temporary bump — reserve it for your gold and silver provinces, where the leverage is greatest, and never mistake it for a permanent fix: the moment you unassign the minister, the effect walks out the door with them.
Market Access: The Third Stat
There is a third pillar, and it is the one most players complete a hundred-hour campaign without ever understanding. The economy runs on a dependency chain: proximity feeds control, and control and connection together feed market access. If control is how much of a location's wealth you can tax, market access is how much of a location's production the market can actually use. A province can have perfect control and still underperform — because its goods are strangling on the way to the market center.
Every location belongs to exactly one market, and it belongs to whichever market attracts it most — hover the market access icon and the game prints a ranked list of suitors. This is recalculated monthly, so locations can and do switch markets when you improve connections or a rival's market center decays. Market access itself is computed like proximity: a path runs from the location to its market's trade center, priced hop by hop, with sea transport far more efficient than land, roads helping, and downstream river transport being absurdly cheap. If access pinches at some narrow passage on the map, that pinch is visible as darker shading on the market map — and it is an invitation to site a new market center nearby.
What market access actually does, once the path is priced:
It multiplies production building output. A building that would produce eighteen units at full access produces thirteen at 73% access. Clean, direct, and visible in the building tooltip.
It changes RGO profit — despite the tooltip claiming otherwise. The RGO interface insists market access has no impact, and this is misleading enough to have fooled players for years. The raw extraction volume really is unchanged: the same quantity of amber reaches the market either way. But the profit the RGO earns shifts with access, which changes the taxable wealth the location generates. Test it yourself by moving a market center and watching an RGO's income change with identical output. The tooltip is not lying about volume; it is silent about money.
It sets who eats first. Market access determines the order in which locations receive goods and food from the shared market. A low-access location can run out of food and production inputs while warehouses elsewhere sit full — and a starving location grows unhappy, which you already know feeds back into control. The three pillars are not three systems. They are one system.
Two rules prevent the most common self-inflicted wounds. Keep your political capital and your trade capital in the same place, or at least make the split a deliberate choice — an accidental trade capital means your single best province is quietly paying a permanent access tax, and many players never notice. And when you do split markets, do it properly: only spin off a new market in a city with a maxed marketplace, backed by at least two towns with fully upgraded marketplaces of their own, so the new market does not choke on its own trade capacity. One well-placed market beats one giant one — income is the only scoreboard. The buildings and production methods guide covers the marketplace ladder and which production buildings benefit most from access.
The Control Toolkit: What to Build and Where
You now have the full machine: proximity fills control, status and rank and satisfaction cap it, market access monetizes it, and the ratio between tax base and wealth decides whether growth helps or hurts you. What remains is sequencing — which lever to pull, in which order, with which money. Here is the toolkit, ordered roughly by how universally each tool pays off.
1. Proximity speed is the one modifier that is good everywhere. Proximity speed scales the travel cost on every connection, land and sea alike — at 50% speed you pay roughly a quarter less per hop, at 100% about half, with diminishing returns beyond that, so do not expect the second hundred percent to double anything. It comes from laws, advances, government reforms, the centralization-leaning societal values, and your ruler's administrative skill, with local contributions from development and buildings like bridges and canals. Jungles, mountains, and large tribal populations push the other way. Whenever a choice offers proximity speed against some niche local bonus, proximity speed is almost always the correct pick, because it compounds across your entire map.
2. Rivers first, roads second, never both on the same connection. Place governors and develop along river networks before you spend a ducat on roads — a downstream river is a better highway than anything you can build early. Then fill the gaps: roads where rivers do not run, upgraded as your economy allows, with railways reserved for the arteries that actually carry your empire. Check every direction out of your capital before assuming the network is complete; the missing road you find there is worth more than the next building you had planned.
3. Governors project a second capital. A land or naval governor emits proximity into their region the way the capital does, at a fraction of the strength but across exactly the distance where the capital's signal has died. Sit them on river networks for maximum spread. The upkeep is real, so small nations should wait until the economy carries it — but for any realm wider than a few provinces, governors are almost always worth their keep, and they are the standard answer to "this whole region is dark on the control map."
4. Bailiffs are a scalpel, not a paintbrush. The bailiff is a hidden military building — it does not appear in the normal province build list; you will find it under the soldiers buildings in the production tab. It adds a local source of proximity (a fraction of what a capital emits, with a small spillover into neighboring provinces) at the price of doubling noble power in that province. Three things to know before you build one: it does nothing on day one, because it must staff up as peasants promote into soldiers over time; multiple bailiffs around a city do not stack, because the city links to the nearest one; and the noble-power cost is genuinely acceptable, because the nobility is already powerful and you can tax the extra income back. Used correctly — on a gold, silver, or iron province that sits beyond your capital's reach and will never be cheap any other way — a bailiff can roughly double the control a frontier province collects. Spammed across mediocre provinces, it is an expensive way to make your nobles stronger. Build it where the money is, and demolish it if you later fix the region's reach another way. If a distant region cannot justify a bailiff, it probably justifies a subject instead: release it, let a local capital handle proximity, and annex later when you have the advances to integrate cheaply.
5. Urbanize the core, then push the frontier of cities outward. Town and city rank are permanent, stacking, and earned by growth rather than bought — which makes them the highest-return control investment on land you already control well. Every new town gets a temple first. The endgame picture of a mastered realm is simply this: every core location functioning as a city, spreading outward as far as the economy supports, with proximity speed and rivers doing the reaching.
| Tool | Best use | Classic misuse |
|---|---|---|
| Proximity speed (laws, reforms, admin) | Taken whenever offered; compounds across the whole map. | Skipping it for a flashy local bonus that touches one province. |
| Rivers and roads | Rivers carry the core; roads fill the gaps beyond them. | Paving tiles a downstream river already discounts — the road does nothing. |
| Governors | Placed on river networks to light up whole dark regions. | Hired by a tiny early nation that cannot survive the upkeep. |
| Bailiff | One per high-value frontier province: gold, silver, iron. | Blanket-building them and supercharging the nobility for marginal gain. |
| Cabinet increase-control action | Temporary boost on your single most valuable tax location. | Treated as a permanent fix; it vanishes on unassign. |
| Stationed armies | Incidental province-wide bonus; keep levies up briefly after wars. | Garrisoning thousands everywhere and drowning in maintenance. |
| Fleets on patrol | Maxing maritime presence so sea control costs single digits. | Assigning transports, which contribute almost nothing. |
The short version of the whole craft, the four lines worth remembering when the tooltips blur together: raise proximity speed because it never misfires; let rivers carry your core and build roads only where rivers refuse; invest in harbors and fleets so overseas land costs what home land costs; and never forget that control only sets the taxable ceiling — your estates' tax rates decide what you actually keep. Fix the ceiling, then fix the rates, and the "rich but broke" problem simply stops happening.
FAQ
What does control do in EU5?
Control decides what fraction of a location's wealth becomes taxable base — and it gates manpower, sailors, levy size, and how fast population advances socially. At zero control a location is effectively worthless to the state. It does not reduce how much a mine extracts or a building produces; the goods still flow to market. You lose the tax on the activity, not the activity itself.
Why does my rich province make almost no money?
Walk the chain: wealth times control equals taxable base, then estate shares and estate tax rates take the next cuts. A province with strong wealth, 85% control, four estates, one tax-exempt church, and tax rates around half will deliver roughly a third of its wealth to your treasury — that is the machine working as designed, not a bug. Check control first, estate rates second, and only then suspect the building or the trade route.
Do rivers and roads stack?
No. For each connection the game applies only the single best flat reduction. A downstream river already beats every early road, so paving a river tile is wasted money; only the modern road and railway eventually overtake a river. Percentage modifiers — terrain, vegetation, buildings, laws, admin skill — do stack, and they apply after the flat reduction, on what remains.
How do I raise control in a distant province?
In order of durability: integrate it fully toward core status; give the region a governor on a river network; raise proximity speed globally so every hop costs less; and if the province is genuinely beyond reach but genuinely valuable — gold, silver, iron — build a bailiff in it and let it staff up. If none of that pays off, the land belongs to a subject, not to your budget: release a vassal and annex later. Roads alone will not fix true distance; fully roaded frontiers still go dark.
Is control the same as market access?
No, and confusing them is the most common misdiagnosis in the game. Control gates taxation of a location's wealth. Market access multiplies what its production buildings output, changes what profit its RGOs earn, and decides whether it receives food and inputs before or after everyone else. Low control means you cannot tax the province; low market access means the province cannot fully use its own market. Both can be wrong at once, and the tooltips for each live in different places — check both before you build anything.
Should I upgrade RGOs in low-control provinces?
Usually not, and this is counterintuitive enough to deserve emphasis. RGO investment raises the province's wealth, which your scaling costs read in full — but without control, the tax base does not rise to match, so your tax-base-to-wealth ratio gets worse, not better. You are not building wealth; you are building a more expensive version of the same problem. Raise control first, develop second. The one exception: extraction whose output you sell through trade rather than tax, since trade income does not care about control. The bankruptcy, loans, and minting guide covers what to do if the ratio has already dragged you into debt.
Next Reads
- EU5 Economy Guide — the full tax-base pipeline, estates, and the money system control plugs into.
- EU5 Trade and Markets Guide — market access in depth: routing, market splitting, and why goods starve.
- EU5 Estates and Crown Power Guide — the second multiplier: estate tax rates, satisfaction, and privileges.
- EU5 Buildings and Production Methods Guide — which buildings reward control and access, and which do not.
- EU5 Bankruptcy, Loans, and Minting Guide — recovery when the wealth trap has already sprung.
- EU5 Beginner Guide: First 50 Years — the opening sequence for any nation, control included.
- EU5 Best Starter Nations — countries whose geography teaches control gently, and the ones that do not.
- Castile First 50 Years and Hungary First 50 Years — two river-rich cores where this guide's principles pay off immediately.
- EU5 Warfare Guide — levies, sieges, and why stationed armies are a control bonus you should not plan around.
- EU5 Diplomacy Guide — vassal release and annexation as a control strategy for land you cannot reach.